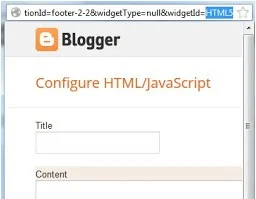
 The first step is to know the ID of the gadget you want to adjust.. To get gadget or widget id, go to your blog layout and open the gadget you want to customize in another window.
 Copy the ID from the window address bar. Then go to your template, click on customise tab and open advanced custom css box.
For instance if your gadget id is HTML5, then use any of the codes below and paste in the advanced custom css box. Adjust the margin number[px] depending on how you want to position the gadget on your blog.
#HTML5 {margin-top:-30px !important;} ----UP
#HTML5 {margin-bottom:-30px !important;} ----DOWN
#HTML5 {margin-left:0px !important;} ----LEFT
#HTML5 {margin-right:0px !important;} ---RIGHT
Don't forget to save or apply to your blog when you are done.
NOTE: ALWAYS PREVIEW YOUR PAGE WITH TWO OR MORE WEB BROWSERS TO KNOW HOW IT APPEARS.


Share Your Thoughts